Egg Potato Salad

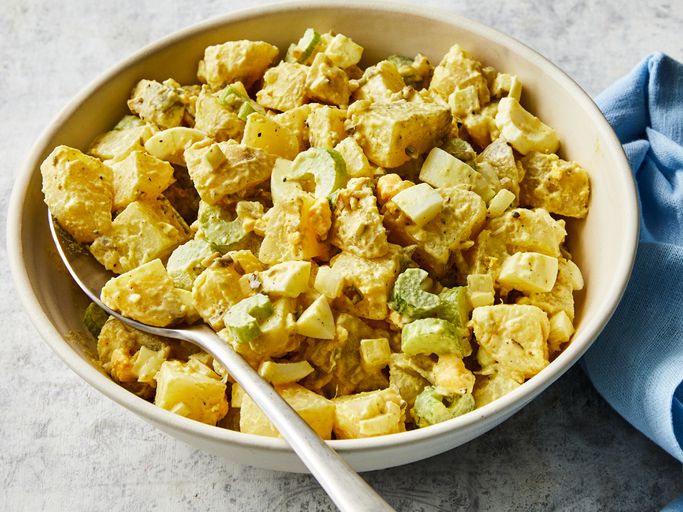
One of my favorite snacks or sides in the world is the Egg Potato salad, its tasty, easy to make, and we usually have everything needed to make it, you can make this a million different ways, none is wrong, and we can make this to your preference, and if your name is Quo-Fan you can even add some hot chili peppers in it, nothing stopping you.

Phase 1 Cooking and prepping

First off we are going to take 5 large russet potatoes and chop them up into small chunks, skin on, and your going to ask why would you leave the skin on, well, thats simple the reason is because the skin is rich in iron, and can help a lot of people, so lets leave the skin on.

We are going to boil these potatoes for 12 minutes, or until they are soft, everyone’s stove is different so the results are going to vary, so keep an eye on them.

Chop up 1 large white onion, if you want to be brave you can use more.

Hard boil 6 eggs, these usually take 12 minutes for us.

Take a can of pineapple and drain the liquid (In a cup for you to drink the juice is the best).

Phase 2 More prep

After the potatoes and eggs are done, let them cool for a while, they need to be cool, not hot or warm.

Once cool, add the potatoes to a large bowl.

Deshell the eggs, and chop them up into pieces and add them to the bowl.

Add the pineapple.

Add the onions.

Add lots of black pepper.

Add half a cup of white vinegar.

and add lots of mayo, (Miracle whip should be your last resort.) make sure you have enough so that it has a rich full consistency, it should have a lot of mayo.

Store this in a fridge covered for a bit and let it go cold.

This honestly is one of my favorite things to eat, and you can actually classify this as a vegan dish if you want, I love it a lot and tastes great, we hope you enjoy!

Bison Burger

Ever wonder what the best burger is? Is it Wagu, it probably is, but honestly its far out of most peoples price range, and isn’t so easy to find or afford, with out blowing your whole pay check on one meal, there is an alternative, and that is Bison, Bison is very regulated, and farmers are not allowed to do the same thing they do with cattle which means that there are no growth hormones’ or any other chemical, so bison is a lot better for you, along with the fact that it is very lean, so it one of the best tasting burgers you can get for your money hands down.

This is one reason you want a very high performance food processor, when Aimee and I want ground beef, we don’t buy ground beef, we buy steak, roast or other meats and grind it into ground beef.

Some times when you find Bison meat, its not ground for you, but rather steaks, or cubes, so if you want burgers you have to grind it yourself, and this is why having a good food processor is important, so you can make your own ground beef.

If you never had Bison before I urge you to take a moment and try this recipe as you won’t be disappointed, this is absolutely the best burger your ever going to eat.

Phase 1 Wheres the Beef

Take your bison meat and simply put it into the food processor, no spices at all, just pure meat, grind it up until its a consistency of ground beef.

Take the meat out and start forming them into patties, we like smash burgers so we just made Bison balls.

You want to leave this sit at room temperature for about 10 minutes before you cook, in the mean time oil a frying pan up and heat it up so when your ready to cook its hot and waiting.

While we are waiting for the patties to come to room temperature we shall make some sauce.

Phase 2 Sauce Me!

In a bowl pour in a lot of mayo, (don’t worry you can save this for future use to.)

put in a small amount of apple cyder vinegar

Put in a bit of ketchup

Put in some mustard

I would put some dill pickles in the food processor and then put this in too.

And give it a good mix and make sure its all incorporated.

Phase 3 Cook the burgers

Fry up your burgers on the last flip put on a slice of good quality cheese, you took your time to make such a high quality burger you want to make sure your using good cheese, don’t cheap out here.

Phase 4 Putting it together

Ok, so its time to put this all together, grab your favorite bun and lets layer.

First we are going to put some lettuce then a bit of sauce.

Your burger, and if you want some more cheese, do her up.

More sauce, tomato, onion, and lettuce and finally the bun.

Thats it folks, your friends should be jelous you have the best burger around, and I promise you, if you serve this to your friends and family, they will absolutely think your the best cook in the world!

You can add some hot sauce to your burger sauce if you want, but personally I don’t think its the best idea in the world, to me it distracts from the flavor of the meat,

Service this with some corn and some homemade French fries!

I hope you enjoy this, drop me a line if you have made this, let me know what you think!

Baked Beans

Baked beans is a very Atlantic Canadian dish, it can feed a large family, its very easy to make, and can be a great comfort food, and is totally worth making.

Please note that when making this you do want to add bacon, use the lower fat version if you can, and please use the real Canadian bacon like this.

Not the round stuff that is often labeled as Canadian bacon, its not.

It is best to use a slow cooker for this, and plan plenty of time ahead because you do need to soak your beans.

Phase 1 Soak your beans

You want to buy a bag of navy beans and put them in a large container and soak them over night, and this is something that you have to do, do not rush this, it should be soaked no less than 8 hours, preferably 12.

Phase 2 Boil

Take your beans and drain and then rinse them off, clean out any bad ones and disregard them.

Boil them for 30 minutes on medium heat.

Phase 3 Making the beans

Ingredients

  1. Pepper
  2. 1 Cup of warm water
  3. Salt
  4. Cloves
  5. All spice
  6. 1 container of molassis
  7. 1 Cup of brown sugar
  8. Yellow mustard
  9. 2 Diced onions
  10. Maple Syrup
  11. Bacon

Into the slow cooker

  1. Lets put the beans into the slow cooker
  2. As you add things in to the slow cooker stir things very evenly.
  3. Take a large measuring cup, add 1 cup of warm water and then add some pepper, salt, cloves, all spice mix well.
  4. Add the mixture and stir.
  5. Add more water until the beans are almost submerged, but not over the beans just under.
  6. Add 1 cup of brown sugar
  7. Add one small container of molasses, make sure to drain it, it can be a real pain to do.
  8. Add a good amount of mustard, a few good squeezes.
  9. Add 2 diced onions.
  10. Add some maple syrup.
  11. Add some sliced up bacon, if you want it to be crispy bacon make sure to fry it up first.

cook this on low on your slow cooker for 8 hours, if you cook this for longer thats ok to, eventually the liquid will reduce and youll end up with an amazing meal, you can top this with more mustard if you want, but what ever you do, do not use ketchup at all! You can serve this with a slice of homemade bread, and if you wish to make this vegan, thats easy just don’t add bacon, or you can always add a vegan alternative.

We hope you enjoy this, we sure do!

Pineapple Curry

Pineapple curry is a great tasting Indian dish that is hot, vegan and tastes absolutely heavenly!

Before serving this I would recommend that you watch who you are serving as someone may have an allergy, or may not be able to handle the heat.

This was fun to make, and didn’t take a whole lot of time to make, it was actually fast, and for this I would I would recommend using a wok.

Phase 1 Ingredients

  1. Chili Sauce
  2. Garlic
  3. Coconut oil
  4. Fresh pineapple
  5. Cinnimon
  6. Smoked Paprika
  7. Garlic powder
  8. Cardimon
  9. Onions
  10. Curry powder

Phase 2 Prep Work

Lets take some time and slice up your onions garlic and pineapple, they should be in bite sized chunks.

Phase 2 Cooking

  1. Start by putting some coconut oil in the wok and letting it turn into oil, some times this is a thicker consistency at the start and needs to melt.
  2. Start adding each ingredient in 1 by one until they are all in, making sure to stir after each add.
  3. Let everything cook out properly and your done, its that simple!

This is a great meal, and very simple and easy to make and should be a major pleaser! You should serve this with rice, and if you want to you can also add cooked chicken with it!

Pink Tacos

Pink Tacos are a great healthy, yes it takes a lot of work, but its well worth the effort, and it is a big way to impress someone with your cooking skills as no one else could imagine taking the time to make, and honestly it tastes amazing!

Ingredients

  1. Cranberries
  2. 3 Cups of water
  3. Cinnimon
  4. Orange Juice
  5. Orange Peels
  6. Hot sauce
  7. 1 Jalopino
  8. Celantro
  9. Can of Mandrines
  10. Can of Peaches
  11. Can of Appricots
  12. Chunky pinapple
  13. Tajin
  14. Lime juice
  15. Fresh Tuna
  16. Salt
  17. Pepper

Phase 1 Cranberry Salsa

  1. In a pot put a bag of cranberries in on medium heat
  2. 3 cups of water
  3. Add some cinnimon
  4. Add some orange juice
  5. Add some peels of some oranges
  6. Add some hot sauce you enjoy
  7. Let simmer for 30 minutes
  8. Remove 75% of the cranberries and blend them, and then combine them and let them sit in the fridge for a while.

Phase 2 Tropical Salsa

  1. Remove the liquid from the Mandarins the peaches, the apricots and pineapples
  2. Add them to a food processor
  3. Chop 1 Jalopino (remove the seeds if you don’t like heat) and add it to the food processor
  4. Add Tajin to the food processor, process the mix, add lime juice and set aside.

Phase 3 Fresh Tuna

  1. We like using fresh tuna for this, its got a great taste and also much healthier
  2. Marinate the tuna with a bit of oil salt and pepper
  3. Cook the tuna the same way you would as a steak just sear it, you don’t want to fully cook it.
  4. Let it rest for 10 minutes, if you don’t the juices and flavor will escape.
  5. Cut it up in very small pieces.

Phase 3 Putting it all together

  1. Where going to get some pink taco shells, (if you can get pink ones, some times there is a lot of false advertising and you don’t get them.)
  2. Start by putting the tropical salsa on the bottom.
  3. Line the next layer up with your tuna.
  4. Finish it up with your cranberry salsa.
  5. Serve it.

We found this to be absolutely delicious and tasty and had so much flavor, and tasted so amazing, when we served it everyone was amazed and surprised, they were first shocked by the name we called it, but in the end, it won them over.

Corn Chowder

Corn Chowder is a simple easy meal, not at all hard, it tastes great, and so simple even a beginner can do this with out a sweat.

As an Atlantic Canadian this is a pretty staple part of our diet, I would recommend you use Russet Potatoes, as they are grown perfect for this.

Ingredients

  1. Bacon
  2. 2 cans of creamed corn
  3. 2 onions
  4. 3 russet potatoes
  5. 1 container of heavy cream (whipping cream)
  6. Celeri
  7. Black pepper

Prepping

  1. Cut up the bacon and put it in a bowl
  2. Slice up the onions, you want these to be very thin
  3. Slice up the potatoes, you want these in cubes
  4. Slice up the celery

Lets get cooking

  1. You want to use a large cooking pot for this, and your going to start by cooking the bacon on the bottom, no oil or greases, bacon produces enough of that, cook it down enough so its cooked but still to the point that its soft.
  2. Add the onion and potatoes, and start cooking them, you want them soft.
  3. Add the cans of cream corn.
  4. Keep mixing this so that its not all stuck to the bottom.
  5. Mix in some pepper.
  6. Start pouring in the milk only to the point that your getting the volume that you want.
  7. Add a lot of black pepper.
  8. Finally add the celery.
  9. Let the chowder simmer and it shouldn’t take too long, and then take it off of the heat.

Thats it, simple and easy and it tastes amazing, best served with crackers, it can be a meal on its own, or you can have it as a side dish, and should taste amazing!

We truly hope you enjoy it!

Cranberry Dijon

Cranberry Dijon is a great condiment, good to use for sandwiches, great for fish, great for a lot of things, so simple and easy, and yet so tangy and delicious and worth having in stock as if you wish to entertain, it will be an eye opener!

Phase 1 Ingredients

  1. Wine
  2. Mustard Seeds
  3. A bag of fresh cranberries
  4. Rice wine vinigar
  5. Onions
  6. Salt
  7. Pepper
  8. Honey
  9. Dijon mustard
  10. Yellow Mustard
  11. Water
  12. Hot sauce

Phase 2 Cooking

  1. In a pot add some wine and a good amount of mustard seeds, let this cook down until soft.
  2. In a food processor cut up some onion and set aside for a few moments.
  3. In a separate pot add a cup or so of water.
  4. Add a bag of cranberries, make sure the water is almost up to the top of the cranberries.
  5. Add some rice wine vinigar.
  6. Add the onions.
  7. Mix well so that its combined.
  8. Add salt.
  9. Add Pepper.
  10. Add some honey, add to your taste.
  11. Add some Dijon mustard.
  12. Add some regular mustard.
  13. Stir some more, and at this point regularly keep stirring up.
  14. Add some hot sauce, what ever you like, don’t make it to hot though, you should be serving this to others do you don’t want to burn them out.
  15. When the pot with the mustard seeds is cooking and the seeds seem like they are nice and soft mix them in with the cranberries and stir well, its important to have them incorporated well.
  16. Cook this until the cranberries get soft and start to no longer be berries and go into a sauce, this can take a while and if its not going to happen for you, remember all stoves are different, you may want to use a blender to help the process.
  17. When this is done cooking, take it off the heat and let cool, it will thicken up and your done, serve with a sandwich or some meats, and this will be an awesome meal.

I hope you enjoy this recipe, this was one of my favorites, try it out, let me know what you think!

Homemade Ice Cap

One of the best delicacies that Canada has to offer is Tim Hortons, while many of us have our own opinions of the place, and the decline of quality that has happened through the years, there are a few things that you have come to accept, 1. A long line up in the drive through, 2. The double double the co worker is going to treat you with, and the demand for an ice cap!

This is a very simple and easy recipe, just takes some time to do.

  1. Make some coffee, use your favorite blend, let it brew and when its done brewing take 3 cups out of the maker and let it cool, (Tip if its winter let it sit outside to cool down.)
  2. Put the coffee in a blender.
  3. Add a few spoons of brown sugar (Or stevia, we use a diabetic friendly type of brown sugar)
  4. Add the normal amount of coffee cream that you would use in 3 cups of coffee (this is you have left overs if you want only 1 cup of an Ice Cap just reduce it by a 3rd.)
  5. Lastly add 1 tray of ice cubes.
  6. Blend that up until you have a good consistency, pour into a cup and serve.
  7. Optional you can add some whip cream and drizzle some chocolate over it, I know my wife would love this more but she is diabetic like me so, the answer was no.

Its that easy, and simple, and this is a Canadian delicacy and its an amazing taste.

Sloppy Aimees

Sloppy Aimees is my take on a Sloppy Joe, just more healthy fun, and much more tasty.

This is fun, easy and very tasty!

Ingredients

  1. 3 Onions
  2. 3 Green Peppers
  3. Garlic
  4. Ground Beef
  5. Pepper
  6. Salt
  7. Worcestershire Sauce
  8. Spaghettis Sauce
  9. Apple Cyder Vinegar
  10. BBQ Sauce
  11. Your choice of hot sauce
  12. Big burger buns

Cooking

  1. Start by chopping up your onion, green pepper and garlic, it would be best if you had a food processor and let it do it for you, more simple and a lot quicker.
  2. In a oiled frying pan start frying up that mix.
  3. Add in your ground beef, breaking it up making sure its very chunky.
  4. As it cooks down its going to reduce.
  5. Add some pepper.
  6. Add some Worcestershire sauce.
  7. Add some spaghetti sauce.
  8. Add some apple cyder vinegar, not a lot but it does help with taste and works with helping your blood sugar and blood pressure.
  9. Add some BBQ Sauce, your favorite flavor.
  10. If you want some hot sauce this is where you add it in, if your sharing the meal, think about how other people will feel about it, you don’t wanna kill anyone.
  11. Mix this all in good, and cook until done, be careful to make sure the meat is well cooked.
  12. Lastly get your but buns ready and put some mix in until it looks like a sloppy joe, but this time make it messy!

This is a meal best served with fries and maybe some veggies, a great pick me up meal, very simple and quick to make, we really hope you enjoy!

Butter Chicken

This is our butter chicken video, one of the older videos, and honestly it was one of my favorites, who doesn’t like butter chicken, it tastes amazing, and you can make it hot, but you don’t have to, and I think anyone who likes Indian food will tell you they love butter chicken.

I would always encourage you to try to make this if you never had it before, as it is one of those dishes that is simply amazing!

A few things to note, when marinating the chicken you can add some plain fat free Greek yogurt, and when it comes to salt there is a low or no sodium salt you can use and it does make a difference.

Phase 1 Marinating the chicken

Ingredients for phase 1

Boneless chicken thighs

Salt

Garlic Powder (or minced garlic)

Ginger Powder (Or minced ginger)

Onion Powder (or minced onion)

(You can optionally add plain Greek yogurt)

Phase 1

  1. Cube up the chicken thighs.
  2. add the above spices and yogurt if your going to use it.
  3. Let this marinate between 20 minutes to 24 hours.
  4. If your going to add some hot peppers or spice the longer its marinated the hotter its going to be and the better flavor youll have!

Phase 2 Gravy part 1

Ingredients for Phase 2

  1. 2 Onions.
  2. Extra virgin olive oil.
  3. A whole garlic.
  4. Garam Masala.

Phase 2

  1. In a large frying pan put the heat on with some extra virgin olive oil let it heat up.
  2. Chop up the onions and garlic.
  3. Add the onions and garlic and we want to get the onion caramalized.
  4. Mix in the garam masala mix.
  5. Mix everything

Phase 3 Cooking the Chicken

This is simple and easy just fry up your chicken, get it fully cooked, you don’t want to be eating bad chicken.

Phase 4 Finishing up

Phase 4 ingredients

  1. Rice wine vinegar
  2. 2 cans of crushed tomatoes
  3. Half a box of butter
  4. Red pepper flakes
  5. Whipping cream

Phase 4

  1. In your pan with the carnalized onions, add some rice wine vinegar.
  2. Add in 2 cans of crushed tomatoes.
  3. Take this portion and add to a blender or food processor to make smooth and then replace back into the pan.
  4. Chop up the butter into smaller sticks and add it into the gravy and make sure the butter is melting down.
  5. Put the cooked chicken in.
  6. Add some red pepper flakes.
  7. Add some whipping cream in.
  8. Make sure to keep stirring.

This is basically it, there are other spices you can add, and you can make keep improving this, and this is a yummy base for making an amazing meal!

I would serve this with rice and some nan bread, and honestly it is an amazing meal! Enjoy Bon Appitite.